VoIP Instructions
The S&T VoIP Web Tools application enables you to set up your new phone service according to your preferences.
First, log in to the VoIP Web Tools application
Log in to https://voiceweb.mst.edu
See below for more details
Then, continue to the personalization features within
- Access my voicemail from the web
- Access my voicemail by phone (from off campus)
- Set up my voicemail access PIN
- Add speed dials
- Block a specific phone number
- Set up call forwarding
- Send a fax
- Receive a fax
- Override caller ID
- Set up my phone settings
Log in to VoIP Web Tools application
To set up your phone with the new VoIP System, you must first log in to the VoIP Web Tools application. To log in to the VoIP Web Tools, follow these steps:
1. Open up your preferred browser (Firefox, Internet Explorer, Safari, Chrome, etc.), and type https://voiceweb.mst.edu into the address and press Enter.
2. At the Authentication Required popup window, enter your university user name and password in the corresponding User Name and Password fields.
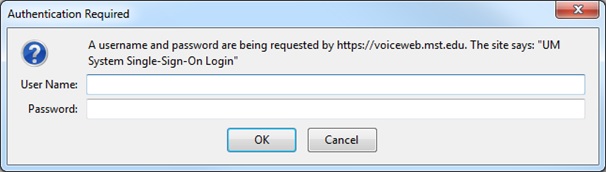
3. Click on the OK button, and the VoIP Web Tools Main Menu appears.

- RETURN TO TOP -
Access my voicemail from the web
The VoIP Web Tools application provides web access to your voicemail for you to view, listen, mark as read, or delete voicemail messages. To access your voicemail, follow these steps:
1. From the VoIP Web Tools Main Menu, click on the VoiceMail Web UI link.
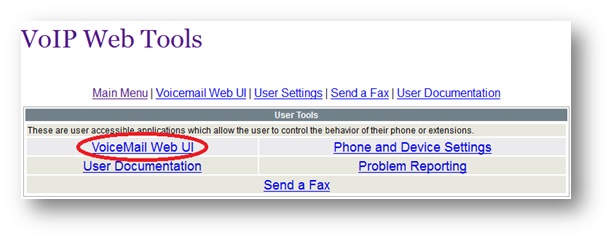
The Voicemail Access window appears with any voicemails displayed and includes the date and time the voicemail message was created, your phone line, the number from which the call originated, the length of the message, and the available actions you can take.
2. Under the Actions column, click on the Listen (MP3) or Listen (WAV) to play the voicemail.
3. Click on Mark Read to indicate that you have already listened to the voicemail file.
4. Click on Delete to remove the voicemail.
Following is a sample email that is sent to your Inbox when you receive a voicemail.
|
Sample email Message for Voicemail Message From "Joe Miner" 5735550700 Created: Monday, May 19 2014, 05 56 PM Voicemail Web Access Listen to Message (MP3) Listen to Message (WAV) |
- RETURN TO TOP -
Access my voicemail by phone
If you are off campus and need to access your voicemail by phone, follow these steps (only if you currently have a voicemail PIN in place):
1. Dial 573-341-7861.
2. When asked to Enter ID, you MUST enter your full 10-digit phone number followed by the pound sign (#).
Note: If you only enter your 4-digit extension, the system will disconnect.
3. Enter your PIN.
4. Choose option 5 for advanced features.
5. Select 1 to record a new message or 2 to choose from existing messages.
6. Follow prompts as appropriate.
Note: If you have not created your PIN, you will need to set up your PIN first. Refer to the Set Up Your Voicemail Access PIN section.
- RETURN TO TOP -
Set up my voicemail access PIN
If you are going to access your voicemail account from off campus, a PIN is required. To set up a PIN, complete these steps:
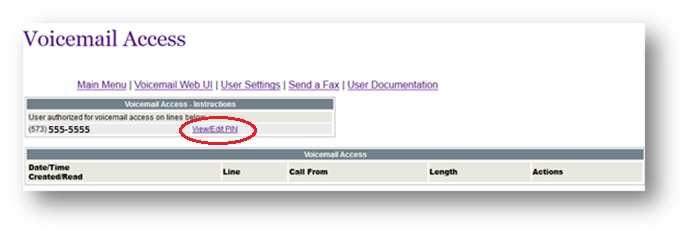
1. From the VoIP Web Tools Main Menu, click on the VoiceMail Web UI link.
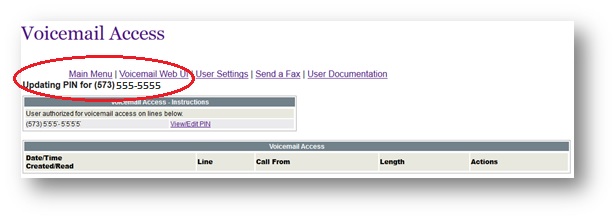
2. The Voicemail Access window appears with your user authorized voicemail line.
3. Click on the View/Edit PIN link.
4. Enter a new PIN in the New PIN field. It must be at least five numeric digits.
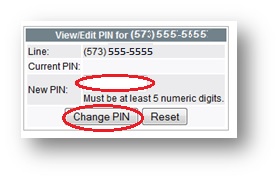
5. Click on the Change PIN button. An Updating PIN message appears on the window.
Note: If you click on Reset, it clears the field.
Note: The next time you go to the Voicemail Access window, your PIN will display in the New PIN field.
- RETURN TO TOP -
Add speed dials
The speed dials are based on the buttons on your phone and will display on your phone after you add them. To set up your speed dials, follow these steps:
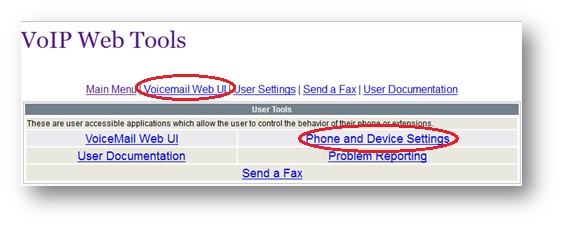
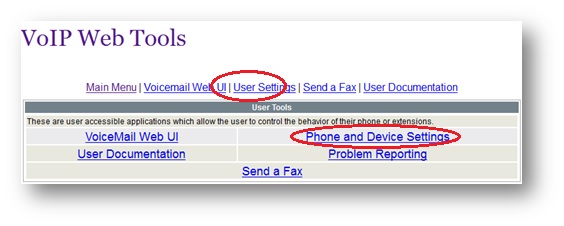
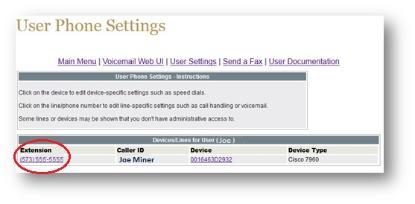
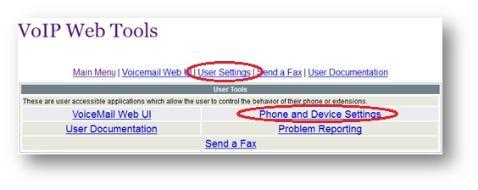
1. From the Main Menu, click on the User Settings link across the top of the page or the Phone and Device Settings link under User Tools.
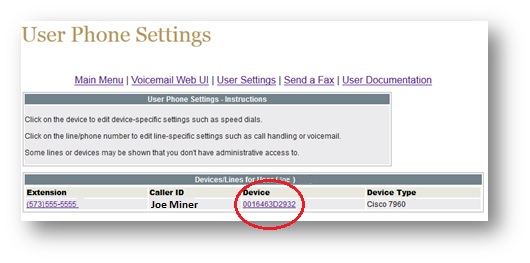
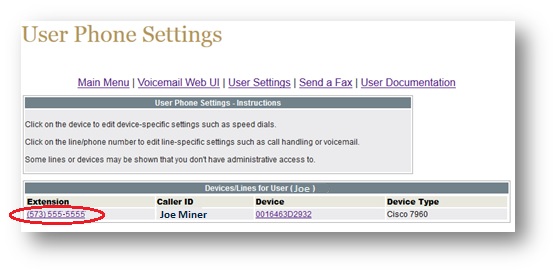
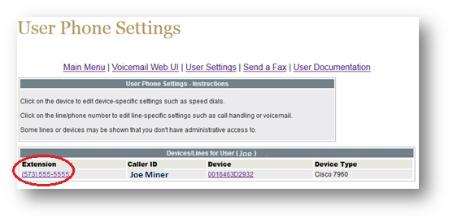
2. From the User Phone Settings page, click on the Device link (the number under the Device column heading).
3. On the next page, under the Device Assigned Speed Dials section, enter the first number that you would like to have as a speed dial in the Add Speed Dial field. Enter this number as you would dial it.
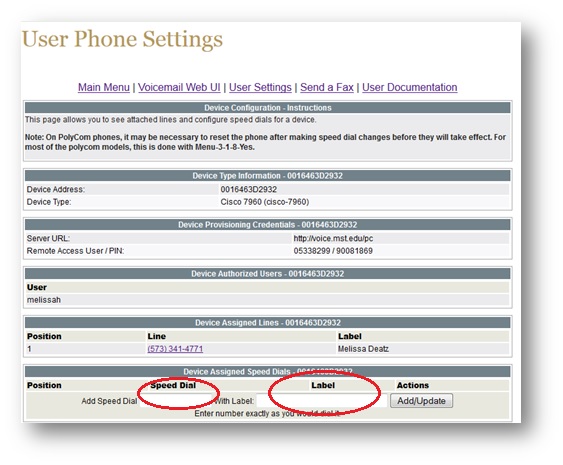
4. Enter the person’s name in the With Label field for the given speed dial number.
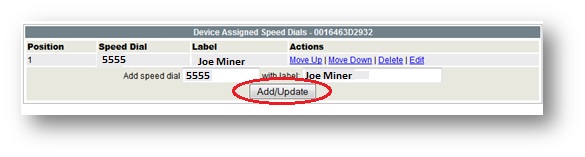
5. Click on the Add/Update button. The new speed dial is added.
Note: There is no limit on the number of speed dials that you can add; however, only 8 will display on most phones.
- RETURN TO TOP -
Block a specific phone number
To block a specific phone number or numbers, complete these steps:
1. From the Main Menu, click on the User Settings link across the top of the page or the Phone and Device Settings link under User Tools.
2. From the User Phone Settings page, click on the Extension link (the number under the Extension column heading).
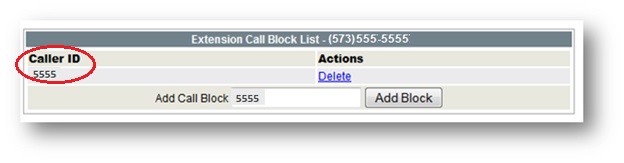
3. On the next page, under the Extension Call Block List section, enter the number you wish to block in the Add Call Block field. Enter the number exactly as it shows up in Caller ID. The field is numeric only and will not process text.
4. Click on the Add Block button. The number will be blocked and will display under the Caller ID column heading.
- RETURN TO TOP -
Set up call forwarding
Call forwarding can be setup via the voiceweb.mst.edu site. You don't need to have physical access to your phone.
To set up call forwarding, complete these steps:
1. From the Main Menu of voiceweb.mst.edu, click on the User Settings link across the top of the page.
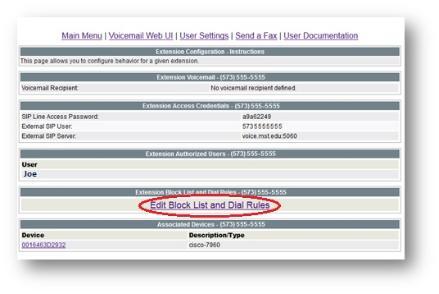
2. From the User Phone Settings page, click on the Extension phone number link (the number under the Extension column heading).
3. On the next page, click on the Edit Block List and Dial Rules link.
4. On the next page, under the Extension Call Forwarding section, enter the phone number you wish to forward to in the Target Number (*86 for voicemail) field.
- This phone number can only be a local phone number
- If you do not have a local phone number, please update your office voicemail recording asking the caller to email you contact information so you can return the call.
- Do not add the area code
- Leave out any dashes
- The number should start with 3 to signify to the system that the number is external to the university VOIP system. Example: If your phone is 573-123-4567. You would enter 31234567.
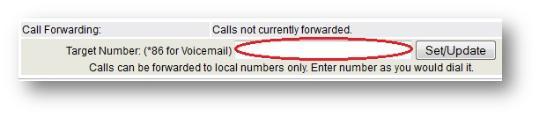
5. Click on the Set /Update button. You have successfully set up the call forward feature when you see *Forwarded* in red next to the Call Fowarding label that is visible in the screenshot above.
- RETURN TO TOP -
Send a fax
All users can send outbound faxes with the new VoIP phone system. To send a fax, follow these steps:
1. From the Main Menu, click on the Send a Fax link under User Tools.

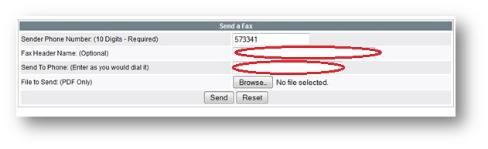
2. From the Send a Fax page, In the Send Phone Number field, enter your full 10-digit phone number. The area code and prefix will populate, but you will need to add your 4-digit extension.
3. Enter the fax heading in the Fax Header Name field. This field is optional.
4. Enter the fax number in the Send To Phone field. Enter this number as you would dial it.
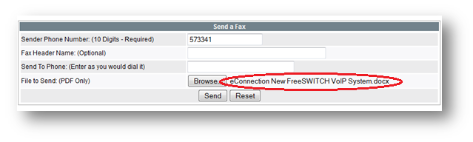
5. Click on the Browse button to search for the file you want to fax.
6. From the File Upload window, select the file and click on the Open button. The file name will display next to the Browse button.
7. Click on the Send button. You will receive a notification email to indicate whether the fax was successful.
Note: The system will not try to resend the fax if the phone number is busy.
- RETURN TO TOP -
Receive a fax
The inbound fax feature should only be enabled temporarily. To enable this feature, you will need to contact the S&T IT Help Desk at 573-341-4357 or submit a ticket online.
Note: Once this feature is enabled on a phone, all incoming calls will receive the fax tone until the feature is removed.
- RETURN TO TOP -
Override caller ID
If you frequently receive calls from a number that is “unknown”, and want to attach a name to the number, you can use the override caller ID feature. To override caller ID, follow these steps:
1. From the Main Menu, click on the User Settings link across the top of the page or the Phone and Device Settings link under User Tools.
2. From the User Phone Settings page, click on the Extension link (the number under the Extension column heading).

3. On the next page, under the Extension Block List and Dial Rules section, click on the Edit Block List and Dial Rules link.

4. In the Extension Caller ID Override List section, enter the phone number you wish to override in the Phone field.
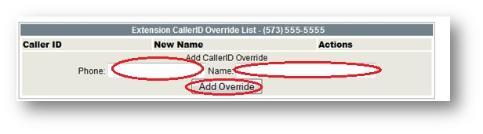
5. Enter the name that you would like to display for this phone number in the Name field.
6. Click on the Add Override button. An incoming call from this phone number will now display the name you provided.
- RETURN TO TOP -
Set up my phone settings
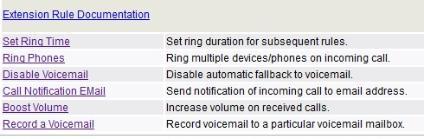
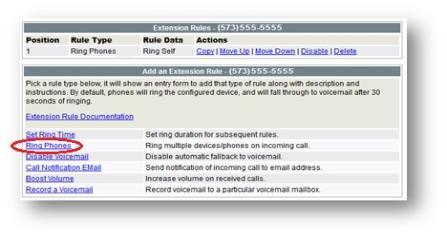
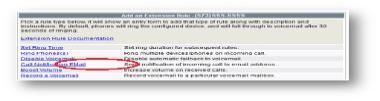
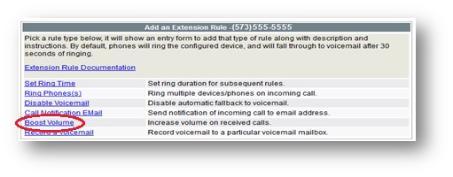
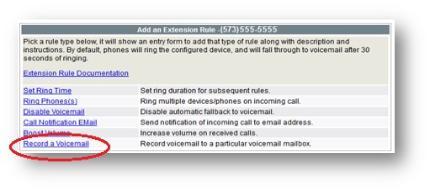
There are multiple user phone settings that you can set up and edit for your extension. These advanced features, also referred to as extension dialing rules, are optional and include
- Set Ring Time – Set ring duration for subsequent rules.
- Ring Phones – Ring multiple devices/phones on incoming call.
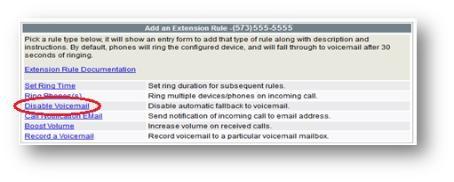
- Disable Voicemail – Disable automatic fallback to voicemail.
- Call Notification Email – Send notification of incoming call to email address.
- Boost Volume – Increase volume on received calls.
- Record a voicemail – Record voicemail to a particular voicemail mailbox
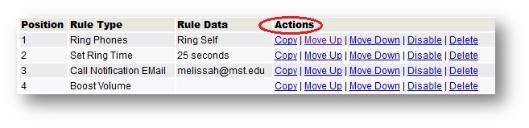
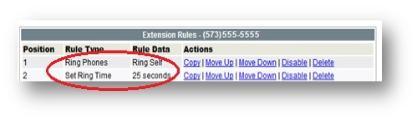
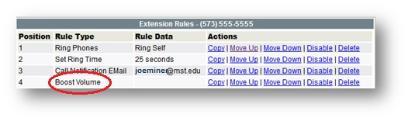
These extension rules are prioritized and processed in the order that you enter them as shown by the Position and Rule Type fields below. However, you can change the rule priority by clicking on the Move Up or Move Down links under Actions. You can also Copy, Disable, and Delete each rule by clicking on those corresponding links.
Access the User Settings Advance Features
To access and establish your preferred user settings, complete these steps:
1. From the VoIP Web Tools Main Menu, click on the User Settings or the Phone and Device Settings link.

The User Phone Settings window appears.
2. Click on the Extension link.
3. At the next window, click on the Edit Block List and Dial Rules link.
On the Edit Extension Dialing Rules window, the list of extension rules is displayed.
- RETURN TO TOP -
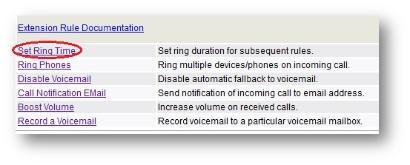
Set ring time
Use this dialing rule to establish how long you want your phone or other phones to ring before moving on to the next dialing rule. The default ring time is 30 seconds.
1. To set ring time, click on the Set Ring Time link.
2. Enter the second that you would like your phone to ring in the Ring Time in Seconds field. By default it is 30 seconds.
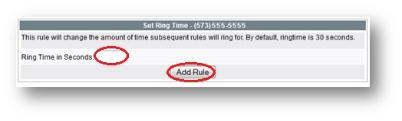
3. Click on the Add Rule button. The ring time is now set to the value you entered. It also appears under the Extension rules.
- RETURN TO TOP -
Ring multiple phones
The Ring Multiple Phones rule will cause multiple devices (or local phone numbers) to ring simultaneously when a call is received on this extension. You can also set it to only ring the other extensions and not ring on your device. For instance, if you know you will be out of the office and want to ring the other phones during your absence, you can set up the rule to ring the other phones while you are away.
To ring multiple phones or devices on an incoming call, follow these steps:
1. From the Edit Extension Dialing Rules window, click on the Ring Phones link.
2. Click on the Yes radio button for the Ring this extension.
3. Enter the phone numbers you want to ring in the Number fields. Enter the numbers exactly as you would dial them: 4 digits for on campus or “3” + the 7-digit number for off campus.
Note: You can only ring local phone numbers.
4. Click on the Add Rule button. Incoming calls will now ring simultaneous to each of the phone numbers entered. Likewise, the Ring Phones rule will appear under the Extension Rules.

- RETURN TO TOP -
Disable voicemail
All extensions by default have voicemail. This feature allows you to disable this default. To disable automatic fallback to voicemail, follow these steps:
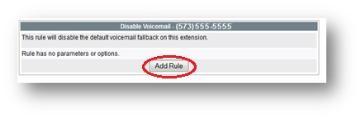
1. From the Edit Extension Dialing Rules window, click on the Disable Voicemail link.
2. Click on the Add Rule button. The voicemail fallback for the given extension is now disabled.
- RETURN TO TOP -
Set call notification email
The Call Notification Email rule sends an email with Caller ID information to your inbox when your phone is ringing inbound. When you are in a meeting, this rule would enable you to see on a mobile device that you are receiving a phone call. To set up this feature, complete the following steps:
1. From the Edit Extension Dialing Rules window, click on the Call Notification Email link.
2. In the Email Addresses field, enter the email address that you want to receive notification emails.
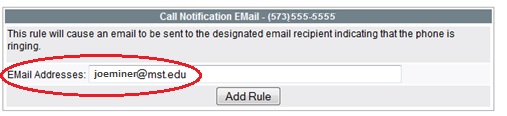
3. Click on the Add Rule button. The new Call Notification Email rule is added.

Looking at the above rules, the system will ring your phone for 30 seconds (default). Then it will change the ring time to 25 seconds. Next it will send a notification that you are receiving a call and you will receive the notification in your email.
After the Call Notification Email rule is added, you will receive notification emails in the following format:
Call To: <your phone number>
Call From: <caller's phone number>
Caller Name: <caller's identification>
Call Time: <date and time of call>
- RETURN TO TOP -
Boost volume
If your phone is not loud enough even at the maximum, this feature will further amplify your sound. To increase the volume on received calls, complete these steps:
1. From the Edit Extension Dialing Rules window, click on the Boost Volume link.
2. Click on the Add Rule button.
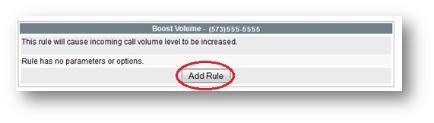
3. The Boost Volume Extension Rule is added.
Note: You can only add the rule once to increase the volume.
- RETURN TO TOP -
Record voicemail
This feature allows you to record a voicemail to other phone extensions. It sets a dial rule to go to a specific voicemail. For example, if a professor has a phone in his office and in his lab, this feature will allow him to access voicemails from either phone.
To forward a recorded voicemail to a particular voicemail mailbox, follow these steps:
1. From the Edit Extension Dialing Rules window, click on the Record a Voicemail link.
2.In the Voicemail 10-Digit Extension field, enter the number for which you would like to forward a voicemail. Leave it blank to deliver to the mailbox associated with the given extension. Note that this can be used to have multiple phones deliver voicemail to a single mailbox.
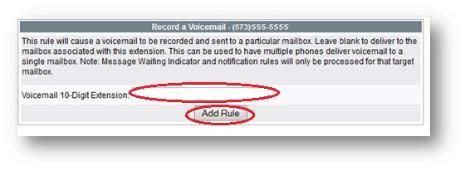
3. Click on the Add Rule button. The new rule will be added.
Note: Your previous recorded voicemail greeting will be deleted when the FreeSWITCH conversion is completed; therefore, you will need to set up your new voicemail greeting message. To set up your voicemail greeting, click on the Message button and then follow the prompts as you normally would.
- RETURN TO TOP -