Connect to a Network Printer

Windows

  1. Click to open your Start Menu at the bottom left of the screen.
  2. Locate and click the Help Me Print folder.
    1. If you don't see the folder, open File Explorer by searching for it in the Windows search bar.
    2. At the top of the File Explorer window, find the main file bar next to the upward arrow.
    3. Highlight and clear that field, then type: \\winprint.mst.edu\shortcuts\Windows_Printers\. Press enter.
  3. A new window will open that contains a folder for each building, open the folder of your building.
  4. Double click the printer name that matches the name located physically on the printer.
  5. There will be a slight delay, do not double click the printer name again.
  6. After a minute, the printer's queue should open.
  7. Once the queue appears, the printer has been added to your computer.

If you have a machine that is not joined to the domain or you don't see the Help Me Print folder, you can still connect to the printer by following the instructions below.

  1. Make sure you're on on-campus Wi-Fi or are connected to OpenVPN if off-campus.
  2. Open File Explorer by searching for it in the windows search bar at the bottom left of your screen.
  3. Click on This PC.
  4. At the top of the window, select the Computer tab.
  5. Then select Map Network Drive.
  6. You may select any letter for the Drive: dropdown menu.
  7. In the Folder field, type: \\winprint.mst.edu\shortcuts\Windows_Printers\
  8. Click the Connect using different credentials checkbox.
  9. Click Finish.
  10. A login window will pop up.
  11. In the User name field type UM-AD\Username (e.g. UM-AD\joeminer). In the Password field, use your University password. Then, click OK.
  12. A new window will open that contains a folder for each building, open the folder of your building.
  13. Double click the printer name that matches the name located physically on the printer.
  14. There will be a slight delay, do not double click the printer name again.
  15. After a minute, the printer's queue should open.
  16. Once the queue appears, the printer has been added to your computer.


 Mac

  1. Click the Apple Icon in the upper left
  2. Click System Settings...
  3. In the search box, look up "Printers & Scanners"
  4. Select Printers & Scanners
  5. Click Add Printer, Scanner, or Fax...
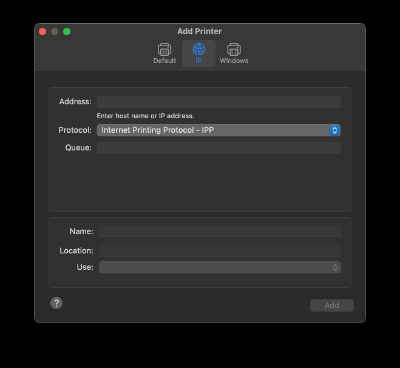
  6. Select the IP option. (see the image for reference)
  7. In the Address text box, type the name of the printer and add .prn.mst.edu to the end
  8. In the Drop Down box under Protocol, Change it to HP Jetdirect - Socket
  9. If you would like, you can add the location under Location, but it is not necessary
  10. In the Drop Down box under Use, change it to Generic PCL Printer 
  11. Click Add
  12. If the printer has a Duplexer (it flips the paper over itself without manually reinserting it to print on both sides [most modern printers have this feature]) select the checkbox
  13. Select Done
  14. Try printing something to test that it worked!
  1. When you send a print job, the print queue window will pop up
  2. Click on the refresh button to the right and the login prompt will appear


  3. Log in using (e.g. UM-AD\joeminer) followed by your password
  4. The print job should then be released
  1. If you forget to refresh the print queue when you send the print job, go to Printers and Scanners
  2. Find and double click the printer
  3. Click the refresh button to the right of the print job queue


  4. Log in using (e.g. UM-AD\joeminer) followed by your password
  5. The print job should then be released